Monday, January 31, 2011

Marriage weekend


I spent the weekend with my hubby and my good friends at a marriage retreat. I know, I know, marriage retreats sound like a lot of hugging it out and crying and blaming...but that's just not how we roll. This was a very different approach to making your marriage a success than what you'd expect from a typical marriage retreat.

It was two days of incredible insight on marriage, men and women and how we relate and my favorite; laughing until I peed my Poise Pads. ( I really do have a peeing problem.) The teachings were from a series Laugh your way to a better marriage by a very crazy dude named Mark Gungor.

If you ever get a chance to watch his entire series or to see him in person, I highly recommend it. And you know if it comes with my stamp of approval, it's got to be good. <wink, wink>

I learned so much about myself and Chris. Anyway, I've attached a video below because I just can't do this teaching justice...if you have 5 minutes, it's funnier to watch Gungor do it. Pay close attention to the "Nothing Box" explanation (toward the end). It taught me a lot about my husband and my six year old son.

http://www.youtube.com/watch?v=0BxckAMaTDc&feature=related

Meal Planner Monday

As promised, my busy friends, I've come up with six meals that are fast and simple. Hey, I like to cook, but sometimes I too feel like throwing five ingredients together and letting them simmer in the pot to create the perfect easy dinner. Especially lately.

So here you are six meals simple and easy. (WARNING! Some of them require a crock pot and a few hours)

Italian Sausage and Peppers with Penne
Mexican Grilled Chicken Wrap

Weeknight Lasagna Toss
Stovetop Sausage Mac and Cheese
Noodle-and-Spinach Casserole
Slow Cooker Chicken and Dumplings


Sorry for not having a break down of cost per meal or per serving. You still love me though right?

Friday, January 28, 2011

The Hanger Trick

No, I'm not talking about suspending a child from the back of  a door frame, though believe me there are days! I'm talking about a nifty little trick to get rid of CRAP!!

You know me, this is my mission for 2011- decrapification!!
What crap am I specifically referring to? Well, Clothing of course! If you're like me you can easily become over run with the stuff.

In fact, I was just going through my youngest daughter's drawers and realized half of the clothing in there was size twelve months and she now wearing 18 month clothing. No wonder I was stuffing and stuffing to get things to fit! With kids clothes it can be pretty cut and dry; if it doesn't fit pack it away for the next kid or get rid of it.

But what about the big kids? Not the teenagers either. I'm talking the adult crowd. Where kids clothes have nice little tags that tell us if it fits or not, adult clothing comes in all different shapes and sizes, sometimes very abnormal shapes and sizes!! The problem is, we get fat and we get skinny. Some of us do it in matter of weeks... postpartum weeks! Those little tags on our clothes mean nothing half the time. I can fit in this size when I wear this brand, but not this brand. Needles to say, decluttering our clothing can become a little more complicated.

Then there's that game we all play. (You know you do!) "Maybe if I lose five pounds I can squeeze back into this pair of jeans!" or  "I like the way this looks on the hanger! I wish it looked good on me! Maybe if it seasons a little in the closet it will look good someday." We all do it. We all have articles of clothing we haven't touched in forever hanging in our closet or sitting in our drawers.

Recently I came across a great little blog post over at Suddenly Frugal using a hanger trick to weed out wearable and non-wearable clothes. It's a great little idea if you're dedicated to such a thing. The whole process begins like this:
  1. Start by hanging all of your clothes on hangers facing one way in your closet.
  2. Every time you wear a garment, launder it and get ready to put it away, hang it up with the hanger facing the other way.
  3. At the end of six months, do a walk through of your closet and see how many articles of clothing you never touched—meaning the hangers never changed direction.
  4. Have everyone in your family try this approach in their closet.
Some of you may say that it seems like a lot of work and maybe it easier for you to just toss. But for some of you, like me, this might be a way to trick the old phyche into giving up on garments that will never be worn by you again.

Regardless of how you do it, it just seems like a great idea. After all, spring is coming and that means spring cleaning! It's wintry cold out and a great time to get a head start on that kind of cleaning!

Happy decrapifying!

Thursday, January 27, 2011

Nothing fast about 'em, breakfast bars!

Let me paint a little picture for you. It's 7:45 in the morning. I just got back to sleep after going to the bathroom for the fourth time and finding a comfortable position to fall asleep in.

Then, the sound of pitter-patter coming toward my door. I open one eye, praying the whole time that 's a rat or maybe a rogue squirrel that's trapped in my house. But I'm not that lucky! No, these pitter-patters are coming from someone who weighs roughly 35 lbs and I know what she's going to say and she's going to say it in the most pathetic voice you've ever heard... "Mommy, I'm hungry!"

I know some of you are thinking "tell her to get some dry cereal", right? Well, I've considered that, but I have children who love and need routine (otherwise their heads spin) and this doesn't make my life simple!! Besides, they love milk in their cereal and have you ever watched a six year old pour a gallon jug of milk? Not pretty!

So I thought, why not make them something they can just grab and eat themselves. Something different and fun, something they would love to get themselves-

Homemade breakfast bars!

So here's my attempt to try to appease the kiddies:


First you mix 1 cup of flour, 1 cup of oats, 2/3 of a cup of brown sugar and 1/4 tsp of baking soda in a bowl.

take a 1/2 cup of softened butter and cut it into the flour mixture with a pastry knife or the way I did it with your hands!

mixture should look like this.
Reserve 1/2-1 cup of flour mixture (this will be the top layer of the breakfast bar.

Press the remaining Flour mixture into an ungreased baking pan (this is an 8x8x 2.5)
Spread desired amount of fruit preserves into the crumb mixture.

Sprinkle the reserved 1/2 cup of crumbs on the top.
Spread it out carefully.
Bake in the oven at 350 degrees for 30-35 minutes or until the top becomes nice and brown.
Allow to cool and cut into squares. These squares can be individually wrapped for easy breakfast or even a lunchbox snack.

Just so you know, these were kid tested and approved.

But is it cost effective?(assuming I use mostly generic ingredients)  Lets break it down:

Flour costs roughly $2.00 for a five pound bag. One cup of this flour is about $0.27
42 oz of old fashioned rolled oats costs around $2.50. One cup of oats will cost you $0.40
A 32 oz bag of brown sugar costs about $1.70. 2/3 of a cup of this will cost about $0.14
Baking soda is very inexpensive, a 16 oz box will cost you $0.70. A 1/4 tsp would cost less than a cent, so why even count it!
16 oz of butter costs about $2.99. A 1/2 cup of this butter would run you about $0.75
Last, a 12 oz jar of blackberry preserves costs $1.99. I used about a cup in my recipe and that would cost $0.67

For a grand total of  $2.23 for 16 cereal bars
You can buy 8 Nutri-grain bars for $3.67

I'd say its a deal! It wasn't so hard to make, the kids loved it and it's made of simple ingredients that I can pronounce.

Love it!

Wednesday, January 26, 2011

My Aching Feet!

I had a baby doctor appointment last night and found that after gaining one pound last month (thanks a lot holiday stomach bug!) I made up for it with a six pound increase in two weeks! I couldn't figure out where this weight went. Certainly not my butt, still flat as ever.

Then last night I figured it out. You see,  I spent last night editing a movie poster I designed for an independent film maker.  Needless to say, in my current condition sitting on a computer chair for that long is bound to cause problems.  Knowing that, I wasn't even surprised by that old familiar tingle in my lower extremities. But even I was in for a shock when I looked down and found all that extra weight.  It was in my feet! That's where the six pounds went, to my darn feet. 

GROSS!!!!    
Sorry I had to do that to you all. Disturbing isn't it..not the girth of my feet, but the shear length of my toes or baby fingers as people like to call them.

So what's in store for today? Laundry. I need to get moving and hope that this swelling will go down. I don't like having marshmallow feet.

Tuesday, January 25, 2011

Updating an old Mirror


I've had this old mirror hanging around for quite some time now (actually it was propped up.) Though it got in my way and it was positioned against the wall in such a manner that it actually made me look fatter, I just couldn't bring myself to get rid of it. It had so much potential and it was really well-made.

I had seen friends of mine and other bloggers make their own mirror frames and thought that would be a lot of fun, but I couldn't figure out how to do it well and on a dime. Finally, my inspiration came from my favorite bathroom periodical, This Old House Magazine. There you have it, toilet motivation. I wouldn't be the first person to influenced by the potty...I hope.

In this particular article, (link up here) Tom Silva teaches you how to make a simple mirror frame out of case molding. Since I live in a construction zone, it wasn't hard to find what I needed to fashion the mirror frame.

I only needed to find three layers of scrap supply to make my mirror frame: The backer board, the middle fill, and the frame itself. We had a piece of that fake wainscoting in the basement that was perfect for the backer board and I was able to use the scrap pieces of this paneling for the filler.


I centered the mirror on the backer board and measured an extra 2 1/4 inches around. This left a lip wide enough to glue the filler to and enough room that the frame could be flush with the ends of the panel and fit over the mirror an inch to hold it all together.

I put a layer of glue on the exposed backer board and placed strips of board cut 2 1/4 inches wide all around the mirror...just like a really ugly frame. Don't worry the pretty frame goes on top!


I had to weigh the filler frame down with random bottles of stuff. Time to invest in some clamps right? Hey a girls gotta do what a girls gotta do. Besides it worked fine! I let them dry over night before I attached the finished frame.  

As we've been fixing up our home, there's been an abundance of scrap trim lying around in the basement, so it wasn't hard to find four pieces long enough to frame out this mirror. I actually settled on four pieces of baseboard trim. I like that they were so wide and chunky, the perfect fit for my mirror!
We (meaning Chris, remember I can't bend at the waist!) cut the trim to size, I glued and then screwed through the backer board on the flip side to hold the frame securely in place and I let it dry for a day.

The sides of the mirror were a bit ugly, so Chris cut some corner round molding and framed around the outside of the mirror to hide the nastiness.


I painted the frame antique white (trim paint I had lying around in the basement.) While it was drying I went to the local hardware store to purchase a mirror hanging kit. It cost $13. Hardly broke the bank with that one!
Chris had to hang the Mirror for me, but he's always willing to help! I feed him remember? The finished product looks lovely above my TV. It makes me feel like I have a mantle. Maybe I should invest in one of those fire place recordings to get the full effect!  

Monday, January 24, 2011

Meal Planner Monday

Well Everyone, I've heard you cries for simpler meals and well....it has not fallen on deaf ears, but this is not the week it's going to happen. But please know, I have heard all of you who have said you are too busy or hate cooking, so I will not forget you!

There are many recipes up my sleeves that are fast and simple and I might dedicate a week out of the month to those recipes. So keep on hating to cook and working your butts dog-tired so that you'd rather not prepare food! Blame it on Betty Crocker for making her pre-made meals so easy and then jacking up the price, so we can't afford to feed all the darn kids we have... not to mention all the extra crap she puts in there to kill us slowly!

If you don't enjoy cooking, you might want to kill me this week, as I have included a recipe for Beef Empanadas. Now, just because it sounds weird and the ingredients listed are some you'd never think of putting together, don't dismiss this delicious meal!

This first time I tried a Beef Empanada was 6 years ago, when Chris brought some home from work. A woman he worked with made Authentic Puerto Rican beef emanadas for everyone in his department and he saved one for me...isn't he sweet?!

I took a bite and thought Dear Lord, this is a bit of heaven! It was delicious!! So please, if you do anything this week, give this one a chance. They're a bit labor intensive, but so worth it!

Think about making Emapandas as a family, it would be so much fun! I know some of you have children old enough to do the heavy duty cooking around the house!! I mean, Abby's four now and I often ask her "what you cookin' tonight kid?" She of course looks at me like I have three heads, but someday, someday she will be able to roll up her sleeves and make me some turkey pot pie!

Alright, off my soap box....

Here's your weekly meal planner:
 
Recipe for Italian Sausage and Risotto Rice


Recipe for Weeknight Pork Chops

Recipe for Slow Cooker Chicken 
Directions:  Chop 1 onion, 1 celery stalk, 2 carrots and 1 tablespoon thyme; sauté in butter until tender. Season with salt and pepper. Add 6 cups chicken broth; simmer 20 minutes. Add 2 cups shredded cooked chicken, 1/3 cup mixed chopped dill and parsley, and some lemon juice. Add cooked noodles and serve.   


Recipe for Beef Empanadas

Enjoy!

Friday, January 21, 2011

What I've been up to Today

I woke up this morning feeling like I had been beat up by drunk chicks at a bar (which is slightly less severe being hit by a bus, but one step up from being stepped on by a donkey.) I attribute this to the fact that I tossed and turned all night long looking for that comfortable spot to fall asleep, only never to find it. Yeah well, six more weeks to go. I might as well get used to not sleeping.

Regardless of how I slept last night, I knew I had a lot to accomplish today. I currently have two projects going and my time is divided between two very complex things that aren't quite finished, so I dare not post any pictures of them in this unfinished state. In the meantime, I'll let you in on a little secret- we are going to do some major work on the house this weekend, which includes the kitchen!! (Someone read my blog last week about trim!)

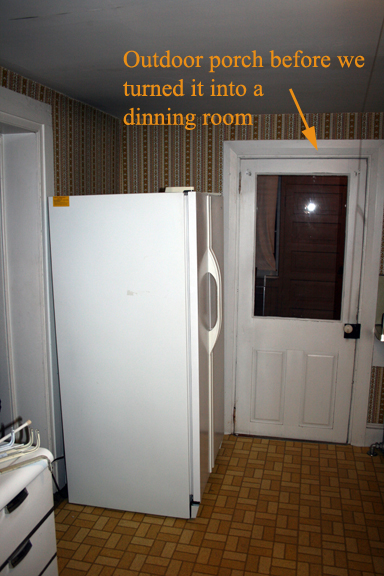
Even though I don't have a lot to show you today, I will share with you some pictures of my kitchen before we renovated it. Some of you might remember how in need of an update this kitchen was. For some of you this might be your first introduction.

First of all you must understand that this part of our house was built in 1900. That's 40 years after the main part of the house was built and it kind-of shows. It seemed like a complete after-thought where the shape and layout were concerned, leaving a kitchen not conducive to what we would consider functional space.

After it was built,  it was updated again in the 1970s or 80s (at least I think, judging from the color scheme, umm brown and orange. What a combo!)

That being said, there were many challenges when it came time to rip out the old kitchen. First of all, there was the small matter of what do we replace it with. We were short on cash and most of the original kitchen pieces were not reusable.

Fortunately my Mother-in-law had a friend who was renovating her own kitchen and had oak cabinets that would have ended up in the dumpster. Problem solved! Free cabinets that were well-made and only needed to be painted.

However, when they got here, we had to fit the cabinet pieces together like a puzzle to make them fit into the room. That was difficult, but with a little finesse and a little bit of beer , we figured out how they would fit and I can say I'm quite pleased with the final setup. (Beer is the thinking man and woman's beverage of choice, it helps loosen up the synapses in the brain for deep thinking!) You'll see pictures of this later... not beer, the kitchen.

The next challenge we had to overcome was plumbing. No one was really sure how to move the sink to the new location. Chris took it upon himself to learn how to do simple plumbing. The man is truly amazing! He taught himself how to complete the plumbing job in the kitchen and in a weekend had the laundry room and sink hooked up to our existing plumbing. What a man!

After all that, the rest of our time was spent building, dry-walling, crying, spackling and painting. Our final step, which we have yet to accomplish, is the finishing touches of trim...beautiful trim!


That folks is were you find us this weekend. I can't wait to post real pictures of my kitchen the way it looks today. So enjoy these pictures of my kitchen the way it was. Please take note of the lovely yellow brick road floor and retro wall paper. I nearly had a seizure every time I went in there. Now go to your own kitchen and thank the Lord it doesn't look like this!


Oh, one more thing. I said that I would thank Chrissy (my little sister) in this post for being a wonderful person. Thank you Chrissy for being a wonderful person. You are the most wonderful person.


Thursday, January 20, 2011

National Thrift Week

Did you know that we are in the middle of National Thrift Week? Yeah me either! When I learned this last night, I thought how interesting it was to have a week devoted to being thrifty. Well, in my research this morning, I found its much more than that!

Apparently, years ago as the United States was on the cusp of entering World War I, some civic organizations got together and decided to promote a campaign to educated Americans and prepare them for a "War Economy." If you've ever sat down and talked to your grandparents about living during World War II, you'll get a good idea of what it was like to live in a war economy.  It usually begins with sentences like "You kids have no idea what it is to sacrifice!" "Shoes? Shoes? You want new shoes? When I was a kid we didn't even have feet!"

On a serious note, their stories really are amazing. Chris's Grandfather, who was only a young boy during the war, described how he and his friends would gather things like tin foil for scrap drives. My Grandmother would talk about the rations they were given during war time. It's always fascinated me that people were willing to collectively sacrifice for the greater good of society. It just seems we've lost that in our modern age.

Now if you think that National Thrift Week is about being stingy, you're mistaken. Thrift week begins on the king of thrift himself, Benjamin Franklin's birthday. Apparently each day in the week of January 17th to the 24th is assigned a principle or guidline to follow:

  • Sunday-  Have a Bank Account Day
  • Monday- Invest Safely Day  
  • Tuesday- Carry Life Insurance Day
  • Wednesday- Keep a Budget Day
  • Thursday-  Pay Bills Promptly Day
  • Friday- Own Your Home Day  
  • Saturday- Share with Others Day 
Aren't those great? So you see, it's much more than shopping at a second hand store or being a tight wad. It's promoting principles that we should be living by each day of the year. It's a practical application of things that if followed really do make life simpler. Come on, pay your bills promptly! That's great!

The best part is,  it all comes to a culmination at the end of the week with Share with Others Day.  That's the one thing I think we've lost the most these days. There's nothing like giving to others to remind you of what really matters especially if you don't have a lot yourself.

It seems that in 1966, National Thrift Week fizzled out and was lost with time. I guess all this economic turmoil lately has brought renewed interest in the holiday and there's a whole movement devoted to bringing it back into the public's awareness.

I'm attaching a video about National Thrift Week for you to watch. It's not very visually stimulating, but it's interesting.  I hope you get a chance to check it out!

Also, here's a link to the Bring Back National Thrift Week website


Happy Thrift Week!

Wednesday, January 19, 2011

Command Strips are the best thing ever!

Anyone who has ever spent weeks spackling, priming, and painting walls will tell you about the pain those little nail holes inflict on their walls and their hearts. Finally after years of nailing picture holes at my parents house and now my own house without care, I have seen the error in my way. This revelation came as we renovated our own home and I spackled and primed and painted my own walls. Now I too feel the pain of nail holes.

What's a girl to do? You want to move your furniture around and because the sofa has a new location you have to move pictures around and lets not forget all the new things you want to put on display! But your husband (or yourself) can't have all those holes ruining the integrity of the wall. And you DO realize that why they tell you it looks good the way it is, even when it looks like crap. They don't want those holes and they'll do anything to stop you! It breaks their hearts to see all that hard work being ruined by tiny little nails!

Now for a solution and one that really works! Our dear friends at 3M, you know the same friends that gave us those beautiful decorative hooks that just stick to the wall and can hold an elephant in place without falling, and best of all without pulling the paint off your wall, have given us the command picture hanging strips.

Normally I would just go out and buy a product like this, even when my children saw the commercial on TV and told me I needed them (they also tell me I need Life Lock to protect my identity.) But I had been given a gift this Christmas that was just screaming to be displayed and I didn't couldn't think of the best way to do it without damaging the door I wanted to hang them on.

My good friend Betsy made these adorable letters for each of my children to hang in their rooms. Cute right? She does things like this all the time, she's very creative! Anyway, I thought "wouldn't these look cute hanging on their bedroom doors?" My only problem was that one of the bedroom doors is hollow and would never accept a nail hole without some serious problems and the other door is 150 years old and though it would have been easy to put a hole in it, that would have felt like putting a hole into your sweet grandma's forehead. She's old and it just doesn't seem right.

I happened to see these command picture hanging strips at Target on sale and grabbed a pack hoping that they really were what they're advertising they would be.

It took me about ten minutes to figure out how they worked, because reading the instructions would have been too easy. When I realized how they worked (much like Velcro) I stuck them to the back of the letters, removed the sticky backs and placed them on the door. Easy as pie! No holes and easy to remove. How great is that?

Needless to say I'm a big fan and can't wait to try it on some of my heavier picture frames to see if it hold up!
But most of all, it brings women and their husbands together in peace and harmony and leaves men without an excuse to help move furniture!!