Do you remember my quest to make my living room feel larger? The culprit was that old black coffee table that was cramping my style and condensing my living space. How did I solve this problem? Two things. One: Remove the coffee table. Two: punish the said coffee table by turning it into a bench.
On a serious note and not because I feel the need to punish inanimate objects, I wanted to re-purpose the coffee table because it's a nice solid piece of furniture and I wanted a bench anyway in my kitchen. Speaking of that kitchen. It is coming along very nicely and I only have two more projects to complete before the grand unveiling! In the mean time though, I'll give you a sneak peak of the area I added the completed bench to.
Now, let me show you how to punish a coffee table.
First, you may want to paint that coffee table. That's a great place to start. Fortunately for me, my coffee table was already painted thanks to projects I had on my nesting list from last summer.
After painting the table and allowing it to dry completely, you will need a board to attach the cushion to. I had a nice little hardwood board that was the perfect size...where else but my basement, a virtual treasure trove of building supplies! Don't even get me started! Anyway, cut your board to size, basically how ever big you want your cushion to be.
Next, I flipped the table over to expose the underbelly of the beast. I want to drill some pilot holes through the bottom of the table so that my screws that will hold the board in place slide in with ease.
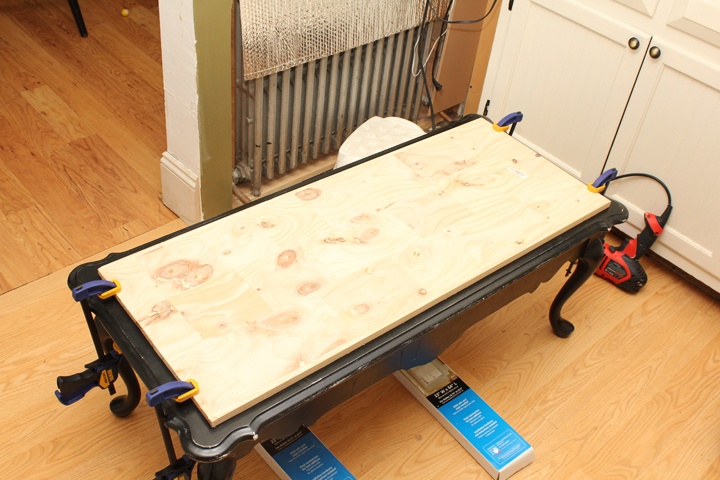
With eight pilot holes to hold the cushion board in place, I then centered the board on top of the coffee table and temporarily attached it with clamps.
Here's the tricky part: I had to center the board on the table and mark the position of the cushion board so that I can remove it to add the padding and fabric. Using a white paint pen and with very small marks, I mapped out where the board would sit when it came time to put it back on.
Center the board and foam over the wrong side of the fabric.
Start with one side, preferably the longest side of the board and begin stapling. Make sure if there is a pattern, like my stripes here, that everything is straight. Staple the opposite side pulling tight, but not too tight, as you staple the fabric to the board.
The short sides require a fold to make it look nice.
Continue to staple until everything is secure.
When the cushion is complete, it's time to move it back to the coffee table. Center the cushion in the confines of the marks you made earlier.
Clamp the cushion to the table and flip over. It's now time to attach the board.
Screw through the pilot holes and flip back over. Remove clamps and now your board and cushion are nice and sturdy. Just something to be aware of, when picking screws for this project, make sure they do not exit out the other side of the board. Otherwise, you have screws digging into your butt, you know what I mean?!
I have a little drawer in my coffee table, so I took this time to add a little flare, by fixing a crystal knob on the drawer front.
I think this little addition dresses this little baby up just enough. It says "hey I like to be formal, but I also like to party" you know like a mullet.
Here's my new bench in my old kitchen. My sweet checks are lovin' this one.


Very cute!
ReplyDeleteThanks!!
ReplyDeleteSo Cute! I can't wait to find a coffee table to do this too!
ReplyDeleteI love it, Angela! It's perfect for that spot in front of the window, and how smart of you to use a coffee table!
ReplyDeleteThanks for joining my party :)
(P.S. Please add my link or party button to the post, k? thanks)
What an incredible idea to use a coffee table for a bench/window seat! Wherever did you dream up such a thing?! ;o) It looks adorable.
ReplyDeleteNow Bets, I never claimed to have dreamt it up, only that I knew how to punish a coffee table;)
ReplyDeleteWow i really love it Angela- it's gorgeous - the legs are fab - and the stripes :)
ReplyDeleteWell done you !!
A xox
Wow ang... you know how to take a simple idea that anyone can come up with and make it awesome!!! anyone can turn a table into a bench... but not everyone can do it with class... you go lady! youre my hero!
ReplyDeleteAdorable idea. can't wait to do this to my $10 goodwill coffee table sitting in the living room.
ReplyDeleteYou are very creative. I love this idea! Thank you for sharing.
ReplyDeleteThis is perfect for the coffee table I have now! Thank you!! I love your site.
ReplyDeleteHey There. I found your blog using msn. This is a really well written article.
ReplyDeleteI'll be sure to bookmark it and come back to read more of your useful info. Thanks for the post. I'll definitely
comeback.
Here is my web site: best golf gps android (www.popeyechat.com)
Hi! I could have sworn I've been to this website before but after checking through some of the post I realized it's new to
ReplyDeleteme. Anyways, I'm definitely delighted I found it and I'll be bookmarking and checking back frequently!
Check out my web site; best rangefinder golf ()
When I originally commented I clicked the "Notify me when new comments are added" checkbox and now each
ReplyDeletetime a comment is added I get three e-mails with the same comment.
Is there any way you can remove people from that
service? Cheers!
Also visit my blog post; top golfing gps
I always emailed this website post page to all my associates, since if like to read it afterward my friends will too.
ReplyDeleteAlso visit my website: cart golf gps ()
Thanks! A great solution for the $5 coffee table I found at Habitat for Humanity. (But, I need to go take a bath after looking at that mullet guy.)
ReplyDeleteI love the victorian look of the coffee table and the lime green on the walls are fantastic!!
ReplyDeleteThat's a great place to start. Fortunately for me, my coffee table was already painted thanks to projects I had on my nesting list from last summer. Classic Sempstress
ReplyDeleteWork benches particularly demonstrate helpful after the case your mechanical engineer would need to take out the head from the vehicle. He would then be able to put it on his work zone and after that have every one of the gaskets and springs essential to repair the rigging.Best rolling workbenches
ReplyDelete