Wednesday, December 14, 2011

Chestnuts roasting on an cardboard fire...

Have you ever seen these little cardboard fireplaces people put up at Christmas?
Well, I hadn't either until a few weeks ago when my neighbor expressed a love for them.

If you know me, I have two weaknesses (more if you ask my husband) One is that I think- NO, I know, that I can make anything. Arrogant? Yes. But only in that respect!! I think negatively about everything else about myself and you can take that to the bank!

My second weakness is I'm a sucker when I hear that you want something rare and handmade. I will move heaven and Earth to make it for you. That is how this whole fireplace came about. My neighbor, as mentioned above, told me a few weeks ago that  her uncle had one of these cardboard fireplaces when she was a little girl and that she always wanted one just like it.

You see, I can't hear that and not want to make that dream come true. I also couldn't just buy one online. I mean really, that would be like the cake boss sending little Debi cupcakes to his kids school birthday celebration. NO, this one had to be lovingly hand-crafted by me. So when my daughter's bunk-bed arrived in super big boxes, I set to work right away crafting a hand-painted cardboard fireplace.

It was surprisingly easier than I thought it would be. I just mentally high-fived myself!


DomesticallySpeaking ”lil

Monday, December 12, 2011

Meal Planner Monday!

Top o' the Mornin' to ya! Boy oh boy! It's been a long time since I've had a chance to post! Too long if you ask me.

Thankfully the Christmas show is over and I can get back to normal...whatever normal is around here! I would have been back in the game last week, but my family was ravaged by a horrible stomach bug and I was up to my elbows in puke and poop. Literally, it was up to my elbows!

BUUUUTTTTT....Today is a new day, heck it's a new week and since it's Monday, it's time for your weekly meal planner!


Ingredients

1 cup dried pinto beans, rinsed
1 jar (11 ounces) mild or medium salsa (1 1/2 cups)
2 tablespoons chopped canned chipotle chiles in adobo sauce
2 tablespoons all-purpose flour
1 1/2 pounds boneless, skinless chicken thighs (about 8)
Coarse salt and ground pepper
1 medium red onion, chopped
1 red bell pepper (ribs and seeds removed), chopped
1/4 cup reduced-fat sour cream, for serving
1/4 cup chopped fresh cilantro, for serving

Directions

In a 5- to 6-quart slow cooker, stir together beans, salsa, chiles, flour, and 1 cup water. Season chicken with salt and pepper; arrange on top of bean mixture. Scatter onion and bell pepper on top of chicken.

Cover and cook on low heat for 8 hours. (Do not open lid or stir.)

Remove chicken from stew; shred into large pieces and return to stew. Serve topped with sour cream and cilantro.

Average Cost of Meal: $7.70


Ingredients

For The Meatballs
2 slices white or sandwich bread, torn into 1-inch pieces
1/2 cup whole milk
8 ounces ground beef (85 percent lean)
8 ounces ground pork
4 ounces ground veal
1/2 cup finely grated pecorino Romano or Parmesan cheese (1 ounce)
3 tablespoons coarsely chopped fresh flat-leaf parsley
1 garlic clove, minced
1 large egg
Coarse salt

For The Sandwiches
2 dozen brioche rolls, split
1 1/2 cups coarsely grated mozzarella cheese (5 ounces)
1/2 cup finely grated pecorino Romano or Parmesan cheese (1 ounce)
Small basil leaves

Directions

Make the meatballs: Soak bread in milk for 5 minutes. Gently mix bread and milk with meats, pecorino Romano, parsley, garlic, egg, and 1 teaspoon salt. Refrigerate for at least 30 minutes.

Roll mixture into twenty-four 1-ounce balls (each about the size of a golf ball).
Heat sauce in a large heavy pot over medium heat. Drop meatballs into sauce, and bring to a gentle simmer. Cook, partially covered, until meatballs are cooked through, 20 to 25 minutes.

Make the sandwiches: Preheat oven to 400 degrees. Working in batches, arrange rolls, cut side up, on a baking sheet. Place 1 meatball, a spoonful of sauce, 1 tablespoon mozzarella, and 1 teaspoon pecorino Romano on bottom halves. Bake until cheese melts, about 3 minutes. Sandwich with basil.

Average Cost of Meal: $14.99

Ingredients

Extra-virgin olive oil, for baking sheet and brushing
10 ounces baby spinach
Coarse salt and ground pepper
All-purpose flour, for work surface
1 pound store-bought pizza dough (thawed if frozen), cut into 4 equal pieces
8 meatballs, halved, and 1 1/2 cups sauce reserved from <u>30-Minute Spaghetti and Meatballs</u>
8 ounces fresh mozzarella, torn into pieces
1/2 teaspoon red-pepper flakes (optional)

Directions

Preheat oven to 450. Lightly oil a rimmed baking sheet. In a large saucepan, bring 1/2 cup water to a simmer. Add spinach and season with salt; cover and cook until wilted, about 2 minutes. Transfer spinach to a fine-mesh sieve and drain, pressing with a rubber spatula to release as much liquid as possible. Transfer spinach to a cutting board and roughly chop.

On a lightly floured work surface, roll each piece of dough into an 8-inch round. In a medium bowl, stir together spinach, reserved meatballs and sauce, cheese, and red-pepper flakes (if using). Season with salt and pepper. With a slotted spoon, divide mixture among bottom halves of dough rounds, leaving a 1-inch border. Fold top half of each round over filling and roll and pinch edges to seal. Carefully transfer calzones to baking sheet. Brush tops lightly with oil and season with salt and pepper. Bake until calzones are golden brown, 15 to 18 minutes.

Average Cost of Meal: $9.60


Ingredients

4 teaspoons olive oil
1 medium onion, chopped
4 garlic cloves, minced
2 teaspoons ground cumin
1 can (4 1/2 ounces) chopped green chiles
2 cans (15 ounces each) black beans, drained and rinsed
2 cans (14 1/2 ounces each) diced tomatoes in juice
Coarse salt
1 package (10 ounces) frozen corn

Directions

In a large saucepan, heat oil over medium. Add onion; cook until softened, 5 to 6 minutes. Add garlic and cumin; cook, stirring often, until fragrant, about 2 minutes more.
To the pan, add chiles, beans, tomatoes and their juice, 2 cups water, and 3/4 teaspoon salt. Bring mixture to a boil; reduce heat to medium-low, and simmer, partially covered, until slightly thickened, about 20 minutes.

In a blender or food processor, puree 2 cups of the stew. Return the puree to the pan, and add corn; simmer until heated through, about 5 minutes. Serve hot.

Average Cost of Meal: $7.91

Ingredients

1 pound ground beef chuck
1 pound ground pork
3 cups panko (Japanese breadcrumbs)
1 1/2 cups whole milk
2 large eggs, lightly beaten
2 garlic cloves, minced
Coarse salt and ground pepper
1/4 teaspoon ground allspice
3 tablespoons butter
1/3 cup all-purpose flour
3 cups canned reduced-sodium beef broth
Grape or red-current jelly, cooked egg noodles, chopped parsley, for serving (optional)

Directions

Preheat oven to 475 degrees. In a large bowl, combine beef, pork, panko, 1/2 cup milk, eggs, garlic, 1 tablespoon salt, 1/2 teaspoon pepper, and allspice. Mix just until combined.

Using a rounded 1-tablespoon measure for each, form mixture into meatballs (you should have about 48). Place meatballs onto two rimmed baking sheets; bake until golden brown and cooked through, 10 to 12 minutes, rotating sheets halfway through.

Meanwhile, make sauce: In a medium saucepan, melt butter over medium-high. Add flour; cook, whisking, 1 minute (do not let darken). Gradually whisk in remaining cup milk and broth; bring to a boil. Reduce heat, and simmer until sauce has slightly thickened, 2 to 3 minutes. Transfer to a large bowl.

Using a slotted spoon, add meatballs to bowl with sauce; gently toss to combine. Serve as an appetizer, on toothpicks, with jelly on the side; or as a main, over noodles, garnished with parsley, with jelly on the side.

Average Cost of Meal: $14.01

Ingredients

Coarse salt and ground pepper
3/4 pound ground turkey (93 percent lean, dark meat)
1/4 cup plain dry breadcrumbs
2 garlic cloves, minced
1 large egg, lightly beaten
1/4 cup grated Parmesan cheese
1/2 cup chopped fresh parsley
2 tablespoons butter
1 pint grape tomatoes, halved
8 ounces orecchiette or other short pasta
1/2 pint bocconcini (about 20 balls)

Directions

Set a large pot of salted water to boil. In a large bowl, combine turkey, breadcrumbs, garlic, egg, 2 tablespoons Parmesan, 1/4 cup parsley, 1 teaspoon salt, and 1/4 teaspoon pepper; mix to combine. Using a level 1-tablespoon measure for each, form mixture into meatballs (you should have about 24).

In a large skillet, heat 1 tablespoon butter over medium-high. Add meatballs, and cook, turning occasionally, until browned all over, 5 to 7 minutes. Add 1 1/2 cups water; simmer, stirring occasionally, until meatballs are cooked through and liquid is reduced to about 1/2 cup, 10 to 12 minutes. Add tomatoes; cook until they begin to soften, about 1 minute.

Meanwhile, cook pasta in boiling water until al dente, according to package instructions. Drain, return to pot, and place on the still-warm burner. Add bocconcini, meatballs and sauce, remaining 1/4 cup parsley, remaining 2 tablespoons Parmesan, and remaining tablespoon butter. Season with salt and pepper, and toss until combined.

Average Cost of Meal: $11.15
---------------------------------------------------------------------------------
Cost for meals this week:
$65.36

Shopping List
Don't forget to go to AllYou.com to find the best deals in your area on these grocery items!

Produce
1 pint grape tomatoes
1 medium onion
1/4 cup chopped fresh cilantro
1 medium red onion
1 red bell pepper
9 garlic cloves
3/4 cup chopped fresh parsley
Small basil leaves

Packaged 

1/4 cup plain dry breadcrumbs
8 ounces orecchiette or other short pasta
egg noodles
2 slices white or sandwich bread
2 dozen brioche rolls, split (croissants make a fine substitute)

3 cups panko (Japanese breadcrumbs)
1 cup dried pinto beans


Canned

1 can (4 1/2 ounces)  green chiles
2 cans (15 ounces each) black beans
2 cans (14 1/2 ounces each) diced tomatoes in juice
3 cups canned reduced-sodium beef broth

Marinara Sauce
1 jar (11 ounces) mild or medium salsa (1 1/2 cups)
2 tablespoons canned chipotle chiles in adobo sauce


Baking
coarse salt
ground pepper
4 teaspoons olive oil
2 teaspoons ground cumin

1/4 teaspoon ground allspice
1/3 cup and 2 tablespoons all-purpose flour


Meat
3/4 pound ground turkey (93 percent lean, dark meat)
1 1/2 pound ground beef chuck
1 1/2 pound ground pork
4 ounces ground veal
1 1/2 pounds boneless, skinless chicken thighs (about 8)


Dairy
4 large eggs
1/4 cup grated Parmesan cheese
5 tablespoons butter
1/2 pint bocconcini (about 20 balls)
1/4 cup reduced-fat sour cream
2 cups whole milk
1 1/2 cups coarsely grated mozzarella cheese (5 ounces)
1 cup finely grated pecorino Romano (2 ounces)


Frozen
 1 package (10 ounces) frozen corn


Friday, November 18, 2011

Busy Season

If your wondering why I've been M.I.A. let me share with you why.

It's Christmas Show time at Glick's Greenhouse! Every year for the past 6 years I've helped my good friends at Glick's Greenhouse prepare for their annual poinsettia show. The show is a display of the beautiful poinsettias they grow there each winter season. It's free, its fun and it's a great way to kick off the Christmas season!

Here a few pictures of the work in progress...

The Theme is a Cowboy Christmas

here's the Postcard I designed inviting people out to the show;


Sales area

That's My Mom! She's my right hand lady and 95% of the landscapes you see, she painted. I love that lady!!


That's the Cowboy I painted. Those awesome mountains are courtesy of my mother!

Close up of the mountains.

The cowboy.


This room's theme centers around a cabin by a creek. There's a sleuth for gold panning and a rustic cabin. The Carpentry is thanks to my friend Andy. He's the man!!! 

Work in progress...


Gold sleuth.

Poinsettias!!

More Poinsettias!!
Andy made this covered wagon. It's the brain child of my friend Michelle.

I'll have more pictures as we fill in the displays. Wait till you see what my friend Betsy does when she fills these spaces in with props!!

Anyway, I've been busy at work, planning and painting and setting up displays. Because I'm busy with that and because I have a lot of kids, blogging has taken a back seat. But after the first week in December the show will be over and I'll have a lot to blog about!

I'll still try to get meal planners out, so check back, please!!


Wednesday, November 9, 2011

Lately I've been feeling very out of shape. You know you can only use the "I just had a baby" excuse for so long. Eight months ago isn't that convincing anymore! With all that in mind, I know that my worst enemy right now and the biggest obstacle to me getting back to my pre-baby weight, would be my constant cravings for terrible foods. Truly, I feel so bad, because even as I'm typing this post, I'm eating junk! Spanish rice with Taco Bell creamy Ranchero Sauce on top, and that's just breakfast! 

This morning I stumbled upon this interesting chart on what your food cravings mean and what that craving is actually telling you your body actually needs. I guess I'll have to try it. My absolute favorite part of the chart though, is the alcohol and recreational drug craving. I'm pretty sure that if your craving recreational drugs that means your addicted to them. I never say things like, "boy, I'm really craving some crystal meth right now! Maybe I'll just have some turnip greens instead, because obviously my badly needs calcium!" Really? 

     if you crave this...     what you really                          Healthy foods that have it...
                                            need is this...         


Monday, November 7, 2011

Meal Planner Monday

Good Monday to you! I finally have some recipes for you today. It was a rough morning. I'm literally covered in snot from my sick babies constant rubbing their noses on my shirt. Do I look like a tissue?


Geez. Here's your meals!


Meal 1

Ingredients
1 tablespoon vegetable oil
1 pound skinless, boneless chicken breast halves
1 jar (24 ounces) Italian Sauce
2 tablespoons balsamic vinegar
2 tablespoons chopped fresh basil leaves
3 cups penne pasta, cooked and drained (about 4 1/2 cups)
1/4 cup grated Parmesan cheese

Directions
Heat the oil in a 10-inch skillet over medium-high heat.  Add the chicken and cook for 10 minutes or until well browned on both sides.  Remove the chicken from the skillet.
Stir the sauce and vinegar in the skillet and cook for 2 minutes, stirring often.  Stir in the basil.  Return the chicken to the skillet.  Reduce the heat to low.  Cover and cook for 5 minutes or until the chicken is cooked through.
Slice the chicken.  Serve the chicken and sauce over the penne.  Sprinkle with the cheese.

Meal 2


Ingredients
1 pound ground beef
1 can (10 3/4 ounces)  Tomato Soup 1/2 teaspoon Louisiana-style hot sauce
1/2 cup crumbled blue cheese or 4 slices blue cheese
4  Hamburger Rolls, split
Lettuce leaves, red onion slices, tomato slices (optional)

Directions
Shape the beef into 4 (1/2-inch-thick) burgers.
Lightly oil the grill rack and heat the grill to medium. Grill the burgers for 10 minutes for medium or until desired doneness, turning the burgers over once halfway through the grilling time.
Heat the soup and hot sauce in a 1-quart saucepan over medium heat to a boil. Reduce the heat to low. Cover and cook for 5 minutes. Top the burgers with the soup mixture. Sprinkle with the cheese. Serve the burgers on the buns with the lettuce, onion and tomato, if desired.

Meal 3

Ingredients


1 tablespoon olive oil
1 1/4 pounds skinless, boneless chicken breast halves, cut into 1-inch pieces
1 large onion, diced (about 1 cup)
1 medium green pepper, diced (about 1 cup)
2 teaspoons Cajun seasoning
1 can (10 3/4 ounces) Tomato Soup
2 cups water
1 cup uncooked regular long-grain white rice
1/2 pound fresh or thawed frozen medium shrimp, peeled and deveined
1 large tomato, chopped (about 1 1/2 cups)
Chopped fresh parsley

Directions
Heat the oil in a 12-inch skillet over medium-high heat.  Add the chicken and cook until well browned, stirring occasionally.
Stir the onion, pepper and Cajun seasoning in the skillet and cook for 2 minutes.
Stir the soup, water and rice in the skillet and heat to a boil.  Reduce the heat to low.  Cover and cook for 20 minutes.  Stir in the shrimp and cook, uncovered, for 10 minutes or until the shrimp are cooked through and the rice is tender.  Stir in the tomato and parsley, if desired.  Let stand for 10 minutes.

Meal 4

Ingredients
8- ounces dry penne pasta, uncooked
1 8- ounce package 1/3 less fat cream cheese, cubed
1/3 cup Shredded Sharp Cheddar Cheese
1/2 cup chopped fully cooked ham
1 10- ounce can Mild Diced Tomatoes and Green Chilies, undrained
1/2 cup Baby Sweet Peas

Directions
Cook pasta according to package directions, omitting salt; add peas during the last 2 minutes of cook time. Drain; set aside and keep warm.
In pan used for pasta, combine all remaining ingredients. Cook and stir over medium heat until cheese melts and mixture is bubbly. Stir in pasta and peas.

Meal 5

Ingredients
For the Chili:
One can kidney beans
One jar salsa
½ lb ground beef
I packet of taco seasoning

For the Fries:
Bag of French fries
1 bag of cheese

Directions
Bake the fries according to package directions
In the mean time, brown the ground beef and drain. Pour in the taco seasoning, salsa, and kidney beans and let simmer. When the chili comes to a boil pour over the fries and top with the cheese.

Meal 6

Ingredients
2 cups Italian seasoned bread crumbs
1/2 cup olive oil
2 pounds pork tenderloin

Directions
Preheat oven to 425 degrees F (220 degrees C).
Mix bread crumbs and olive oil in bowl to reach consistency that would be moist enough to stick to the meat when pressed. Place pork on a shallow cooking sheet. Press the crumb mixture onto all sides of the meat until there is no pink showing, usually 1/4 inch thick.
Bake for at least 35 minutes until a meat thermometer reads 165 degrees F (75 degrees C) or until there is no pink when the pork is cut. Let the pork rest for 10 minutes, then cut into 1/2 inch slices.


Friday, November 4, 2011

Remake a dress that fits with a corset back

Today I'd like to show you how I fit my breastosauruses into my eight year old, much too small, wedding dress. In case you're wondering why I would even want to attempt getting into my wedding dress again. Inevitably enduring the pain and suffering of realizing my body will never ever be that perky or thin again, please refer to yesterday's post- I trashed that dress!

Yes, it's all the rage these days. Slipping back into your wedding dress after the event to get a couple really artsy, really fun shots you never would do the day of your wedding. In all honesty, it IS a lot of fun! I enjoyed climbing trees and getting into frigid water all for that perfect shot. But wait, lets back the truck up! When I first decided to use my retired wedding dress to do this photo shoot, I had to come up with a way to fit my post four babies body (most importantly my post four babies boobs) into a tiny little dress.

In my extensive google search for DIY alterations, I came across a blurb on corset back dresses. In it, a woman with a friend in the alteration business said corset backs were a common solution for fitting into a dress that was a bit too small. It did warn that corset backs only work if all of the other parts of the dress fit. Arms and extreme differences in waist size would require a bit more, but when dealing with the old "I can get the dress on, but I can't zip it up" problem, a corset back will do the trick!

The article was very vague, but with a little imagination I knew this was the perfect solution to my mammoth breast problem. Without further ado here is how to sew a corset back...

Here's the front of the dress. 


The dress is made of silk, so I went to a fabric store and found an inexpensive satin material that matched the color of the dress.
Part One: Modesty Panel


Yeah, it's exactly how it sounds. The modesty panel goes behind the corset so no one sees how squishy the back fat is.
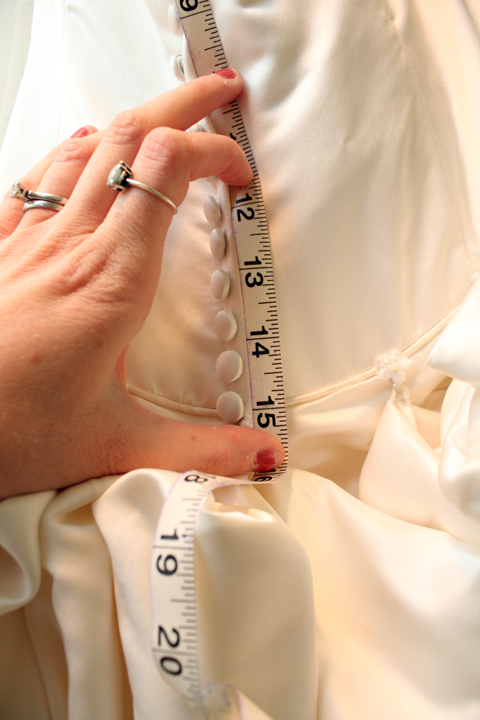
Measuring from the top of the dress to the waist, I get an idea of how long the modesty panel should be.

The measurement was 15 inches.
I added a few extra inches to the panel so that it can be tucked into the dress.
I cut two rectangles twice the length of the measurement I came up with above. In other words, my panel is 18 inches long, so I made my rectangle 36 inches long. 

 I'm going to cut the folded piece into a triangle. I'm going to do this twice and sew the two double sided triangles together so that the fabric modesty panel is nice and sturdy. You can use one double sided panel and sew interfacing in between the sides too if you'd like.
I took the 36 inch panel and folded it to be 18 inches. Then I folded the 18 inch panel in half the long way. I do this so I can cut a symmetrical triangle. 

 Triangle Time!!
The panel is so long I have to use two rulers; one for length and the other for accurate cutting. Using a long ruler, I measure from top right corner to bottom left corner.

Then I take the cutting ruler and butt it up against the long ruler.

I remove the long ruler and cut with a rolling cutter.
You may have to put the long ruler back on the fabric and line the cutting ruler up with it to finish the cut. Do the same thing with the second fabric rectangle. When they're both cut, they should look like this. The above triangle shapes are four layers thick as they are two folded diamonds.

Just to add a little more support, and to hold the two open dianmonds together for easier sewing, I pressed a strip of heat n' bond in the crease of one of the open diamond shapes.

I trim the excess paper.
Then peel back the paper strip.

Then with WRONG sides together I press the two pieces with a hot iron, adhering them together with the heat n' bond. Now any way you flip it the diamond should be shiny satin.

Sew down each side: top, left and right side leaving an opening at the tip of the triangle to turn the panel right sides out.
Finish the rough edges with a zigzag to prevent fraying.
Zigzag Stitch
Now flip that panel right sides out.


Next run a straight stitch around the sewn edges like pictured above.


Finally the open end of the modesty panel can be finished with a zigzag stitch over the rough edges.


Part Two: Replace the Zipper with Corset Loops

The back of my dress was adorned with a plethora of non-functioning buttons. Anything like this needs to go, so put that seam ripper to work!


Before ripping zip the zipper down to about the waist. This varies from person to person. Gauge this by by how far up you can zip it up comfortably. If you can't zipper it up at all, then completely remove  it.
Because I could zip it to the waist, I have to put something on the zipper track to keep it from coming undone. A knotty stitch will do the trick.


When the zipper stoppers are sewn you can trim the top and then  put a hook and eye right above it to keep the zipper from unzipping itself while you're walking about. Consider it a way to keep your hinee from showing!


The next thing to come out is the rest of that ol' zipper. This is the scariest part. It's painless really, but it's scary nonetheless. As I held the seam ripper to the first stitch holding that zipper in place and the cold sweats came over my body, all that was running through my mind was how much I paid for that dress. I then slapped myself across the face and said, "Get over it! You already ruined it with the spilled beer down the front!" True Story.


When the zipper is removed you will most likely be left with the dress bodice and the inner shell or liner. It is in between these two layers you will be putting the corset loops.


Step Three: Sewing the Loops and Ribbon


This step, again, is very flexible and can be tailored to your preference. I chose to make my loops of my corset back to be about 3/4 of an inch wide. Lets face it my girls are really big and they need a lot of support. 


You'll also need to keep in mind how far apart you want the loops to be. If you remember, the back of my dress from top to waist was 15 inches long. 


I think it looks best when the loops are close together, so I chose to set my loops one inch apart all the way down my back.


I started with long strips of fabric

Then I sewed the strips to the desired width.

I was a silly girl and cut the strips before pulling them right side out! You can learn from my mistake and pull the strips right side out before cutting. It will save you 15 minutes or so.


Now you can cut the strips into the sections of loop. I chose to make mine three inches long.


 To keep the satin from fraying, I ran a straight and a zigzag stitch down each side of the cut loops.


Now it's time to fasten the loops to the dress. 


 Here, I pinned each loop an inch apart in between the liner and he outer shell of the dress.


Then I ran a stitch through the outside, loops and liner of the dress.


 Part Four: The Ribbon
First I cut a long very narrow strip of satin. I wanted to keep it about the same width as the loops on the back of the dress.
 I sewed the entire length.

To finish the edges I stuffed the rough edges into the ribbon itself like this:


 Then I sewed with a zigzag stitch to secure it.


 The ribbon is now ready to be looped up!


 Criss Cross all the way down...
Finally tuck the bow into the dress.

 TA DA!

It fits!