Thursday, June 30, 2011
Simply Creative Blog Party #3
My Blog List
Hey Party animals! I hope my Booty Pop inspired you yesterday!
I'm going to a Phillies game today, so when I get back I hope I have a lot of fun things to look at!!
Wednesday, June 29, 2011
Booty Pop- FAIL!
In a world where having extra junk in ya trunk is considered, dare I say, "Sexy," there are a lot of ladies breathing a sigh of relief! Well, I'm NOT one of them- meaning; there's no junk in my trunk! If some girls have a trunk like a Buick Riviera...
I have the equivalent of a Smart car...
Fear not, my fellow flat bottomed friends! There's hope for us after all. Introducing Booty Pop!
My friend Betsy, who I know loves me dearly and only wants the best for my booty, saw Booty Pop at a store and thought of me immediately!
I'm pretty much the poster girl for flat hinees everywhere, so it's no surprise that when Betsy saw this product she thought of me. After all, I come from a long line of plumbers and it true what they say about the crack!
It was a beautiful Sunday morning when I received Booty Pop from Betsy. In fact, we were at church.
In case you don't know, right now I go to a church that meets at a house and there about 15 adults and 1,045 children. Okay maybe not that many kids, but they certainly do outnumber us quite a bit! Anyway, it's a intimate setting. I don't want people to think I put the booty pop on and paraded my rump around a mega church of 3,000!
Back to the story, I received this lovely gift from Betsy for my Birthday. Upon opening it I had to run to the bathroom to try it on. After all, I never miss an opportunity to make a complete fool of myself for a laugh!
With Booty Pop in place, I walked out of the bathroom to show off what should have been a vast improvement for my derriere. The anticipation in the room was apparent on everyone's face...will that booty pop? (I think they were excited about the balloons!)
As my eager audience...oh, this is important: the audience was mostly girls. The only guys in the room were having a conversation about sports and totally tuned out the Booty Pop stuff.
Where was I? Ah yes, my eager audience:
They were all holding there breath and I'd like to think crossing their fingers that the booty Pop would actually work it's magic. Their bated breath released like bags of wind when I turned about for them to see my tooshie. Sadly enough, even Booty Pop could not give my hineer the extra junk it needed. It truly was a Booty Flop.
Oh well, I should just be happy with what I have!
Fear not, my fellow flat bottomed friends! There's hope for us after all. Introducing Booty Pop!
Please take notice of the packaging. Clearly, if your booty does not pop, it's a snore. When you put on the Booty Pop there's a party in your pants...don't you see the balloons?
I'm pretty much the poster girl for flat hinees everywhere, so it's no surprise that when Betsy saw this product she thought of me. After all, I come from a long line of plumbers and it true what they say about the crack!
It was a beautiful Sunday morning when I received Booty Pop from Betsy. In fact, we were at church.
In case you don't know, right now I go to a church that meets at a house and there about 15 adults and 1,045 children. Okay maybe not that many kids, but they certainly do outnumber us quite a bit! Anyway, it's a intimate setting. I don't want people to think I put the booty pop on and paraded my rump around a mega church of 3,000!
Back to the story, I received this lovely gift from Betsy for my Birthday. Upon opening it I had to run to the bathroom to try it on. After all, I never miss an opportunity to make a complete fool of myself for a laugh!
With Booty Pop in place, I walked out of the bathroom to show off what should have been a vast improvement for my derriere. The anticipation in the room was apparent on everyone's face...will that booty pop? (I think they were excited about the balloons!)
As my eager audience...oh, this is important: the audience was mostly girls. The only guys in the room were having a conversation about sports and totally tuned out the Booty Pop stuff.
Where was I? Ah yes, my eager audience:
They were all holding there breath and I'd like to think crossing their fingers that the booty Pop would actually work it's magic. Their bated breath released like bags of wind when I turned about for them to see my tooshie. Sadly enough, even Booty Pop could not give my hineer the extra junk it needed. It truly was a Booty Flop.
Oh well, I should just be happy with what I have!
See you tomorrow at my blog party!
Tuesday, June 28, 2011
The Wedding Gift
As you may or may not know, my Brother-in-law got married this weekend! It was a beautiful wedding and a great party afterward.
One of the things I like to do for friends and family when they get married is paint them a couples portrait. My Brother-in-law and new Sister-in-law are no exception! I wanted to share with you the painting I made for them. I very much enjoyed painting it!
Monday, June 27, 2011
Sorry this is late!! Here's your Monday Meal Planner...Enjoy!
Italian Meatloaf Muffins
Minutes to Prepare and Cook
Ingredients- 1.25 lb. Ground Turkey
1 egg, beaten
1 can diced tomatoes, drained
1/4 cup Italian bread crumbs
1/2 cup Parmesan cheese, divided
1 bell pepper, minced
2 cloves garlic, minced
1 tbsp. crushed red pepper
Italian seasoning to taste - may use 1/2 package of Good Seasons Italian dressing mix
Directions
Preheat oven to 400.
Mix all ingredients (except 1/4 cup of Parmesan) in large bowl. Scoop mixture into muffin tin. Makes 14 medium sized muffins. Top each with a sprinkling of the remaining parmesan.
Bake for 25 minutes or until a light crust has formed on top of the muffin.
1 serving = 2 muffins
Number of Servings: 7
Mix all ingredients (except 1/4 cup of Parmesan) in large bowl. Scoop mixture into muffin tin. Makes 14 medium sized muffins. Top each with a sprinkling of the remaining parmesan.
Bake for 25 minutes or until a light crust has formed on top of the muffin.
1 serving = 2 muffins
Number of Servings: 7
Ground Chicken Mini- Pizza burgers
6 simple ingredients and a muffin tin make this a delicious favorite that can be made ahead of time!
Minutes to Prepare and Cook
Ingredients
- 1 lb. ground chicken ( I use Perdue)
1/2 c Progesso Italian Bread Crumbs
1 c 2% milk Kraft Shredded Mozzarella cheese
1 c Chef Boyardee Pizza Sauce WITHOUT pepperonis, DIVIDED into two 1/2 cups
1 Tbsp Italian Seasoning
3 dashes Black pepper
2 dashes garlic salt OR 1 tsp garlic powder (recipe was calculated using garlic powder)
Directions
1- Preheat oven to 350
2-Pour 1/2 c pizza sauce in bowl and combine with bread crumbs,cheese, pepper, garlic salt/powder and italian seasoning.
3-Add ground chicken, and mix together for 2-4 minutes to insure that all ingredients are throughly mixed
4- Spoon mixture into a 12 serving muffin tin
5-With back of Tablespoon, make indentation into each tin full of mixture (think Volcano)
6-With remaining 1/2 c pizza sauce, evenly divide into each indentation made with back of tablespoon
7- Bake 35-40 minutes; cheese and sauce will be bubbly
Number of Servings: 12
Quick and easy shrimp primavera
- 8 oz. wheat rotini pasta, uncooked
1/2 cup KRAFT Light Zesty Italian Reduced Fat Dressing
1 lb. medium shrimp, cleaned
1 large red pepper, chopped
1 cup packaged matchstick carrots
1 cup fresh sugar snap peas
2 cloves garlic, minced
2 Tbsp. KRAFT 100% Grated Parmesan Cheese
1 tsp. grated lemon peel
Directions
COOK pasta as directed on package.
MEANWHILE, heat dressing in large nonstick skillet on medium heat. Add shrimp, vegetables and garlic; cook and stir 3 to 4 min. or until shrimp are pink and vegetables are crisp-tender.
DRAIN pasta; toss with shrimp mixture. Sprinkle with cheese and lemon peel.
Number of Servings: 4
Recipe submitted by SparkPeople user BEATIEANN.
Lemon Herb Grilled Pork Chop
Ingredients
- 6- 3 oz lean pork chops
1/4 cup lemon juice
3 garlic cloves minced
1 tsp oregano
1/4 tsp cayenne pepper
1/4 tsp black pepper
1 tsp salt
- 1 tblsp oil
Directions
combine all ingredients except pork chops
place chops in bag pour mixture over and let marinate for 4 hours or overnite
preheat grill or oven
remove from marinde and grill or broil
1 chop per person
Number of Servings: 6
Recipe submitted by SparkPeople user MSSBETTYBOOP06.
Number of Servings: 6
place chops in bag pour mixture over and let marinate for 4 hours or overnite
preheat grill or oven
remove from marinde and grill or broil
1 chop per person
Number of Servings: 6
Recipe submitted by SparkPeople user MSSBETTYBOOP06.
Number of Servings: 6
Spanish Rice & Beef
- 1 lb of lean ground beef
1 onion
1 green bell pepper
2 cans (32 oz) of stewed tomatoes
1 cup Mahatma uncooked long grain rice
1 cup water
1 tsp chili powder
1 tsp oregano
1/2 tsp garlic powder
Directions
1. Cooked ground beef, chopped onion and green pepper in dutchoven until meat is browned.
2. Drain in colander, pat dry with a paper towel and clean pan with paper towel.
3. Return meat mixture to dutch oven, stir in remaining ingredients. Bring to a boil; cover, reduce heat and simmer for 30 minutes or until rice is tender, stirring occassionaly.
Number of Servings: 6
Recipe submitted by SparkPeople user KAIROSGRAMMY.
Chicken Basil Pesto Pasta
Minutes to Prepare and Cook
- 16oz Bowtie Pasta
2tbsp olive oil
2 cloves Garlic
2 Chicken Breasts
1/3 c. sun-dried tomatoes in oil
1/2 c. Basil Pesto
Directions
Put bowtie pasta in boiling, salted water. Adding a small amount of olive oil to the boiling water can also help the bowties from sticking together. In a large saucepan, heat olive oil then sautee chopped garlic until soft, but not burned. Add sun-dried tomatoes, chicken, and a dash of crushed red pepper flakes.
Combine chicken mixture with bowtie pasta and pesto in a large bowl and serve. This recipe is good both warm and cold so dig in! :)
Number of Servings: 8
Recipe submitted by SparkPeople user ALF9280.
Combine chicken mixture with bowtie pasta and pesto in a large bowl and serve. This recipe is good both warm and cold so dig in! :)
Number of Servings: 8
Recipe submitted by SparkPeople user ALF9280.
Grand Total for the week: $57.02
Friday, June 24, 2011
The 10 Minute Tuxedo Onesie
As I explained yesterday, I needed something for my baby to wear for his uncle's wedding that would be comfortable and functional, so I set to work on what I like to call the 10 minute tuxedo onsie!
Here's a step by step tutorial on how to make two tuxedos. It's a twofer!!
Start with a plain what Onesie. It cost me $2 at Walmart. |
Next I made a shield shaped template out of cardboard. |
Puffy Paint- if you couldn't read the label. |
Trace the Shield with the puffy paint. |
It only takes a few minutes to dry. |
If you want to get this baby finished in 10 minutes, be impatient and DON'T wait for this to dry. Create the next line beside the shield shape. |
Repeat one the other side. |
Time to make a bow tie. Fold the ribbon in a figure eight. |
Pinch the Bow like a baby's butt cheek. |
Pinch the Bow and stitch the back side to make that pinch permanent. |
For the middle piece, fold the ribbon in half. |
Loop the center ribbon around the middle of the bow tie and stitch. |
Trim the end of the ribbon and Stitch to the top of the onsie. |
Here's how you do it!!!
Start with a long piece of ribbon. Eye-ball the length to fit the onsie and make the finished edge a point. |
Melt the edges to keep it from fraying. |
(Melted Edges) |
Slightly cut the ribbon to taper in at the top. |
Melt the edges here too, to keep from fraying. |
(Melted Edges) |
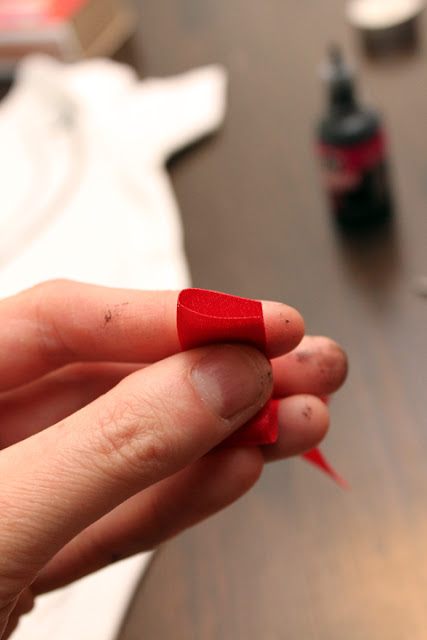
Now for the top of the tie. Fold a length of ribbon in half. |
Begin to create the triangle shape of the tie. |
When you've created the tie top, stitch in place. |
Tuck the left overs into the top of the tie and stitch. |
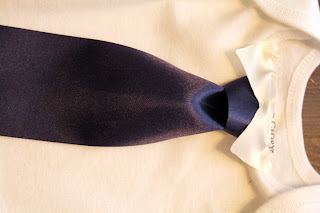
Tuck the top of the tie into the knot and stitch. |
(Stitch together) |
Stitch the tie to the onsie. |
Cut a double triangle and stitch over the top of the tie. |
Party Time! |
Subscribe to:
Posts (Atom)